Wednesday, May 14, 2025

Tea Time Pocket Card for Mother's Day by Lynn Dionne

Happy Wednesday Ai Fans!!!

Watch video tutorial here!!!

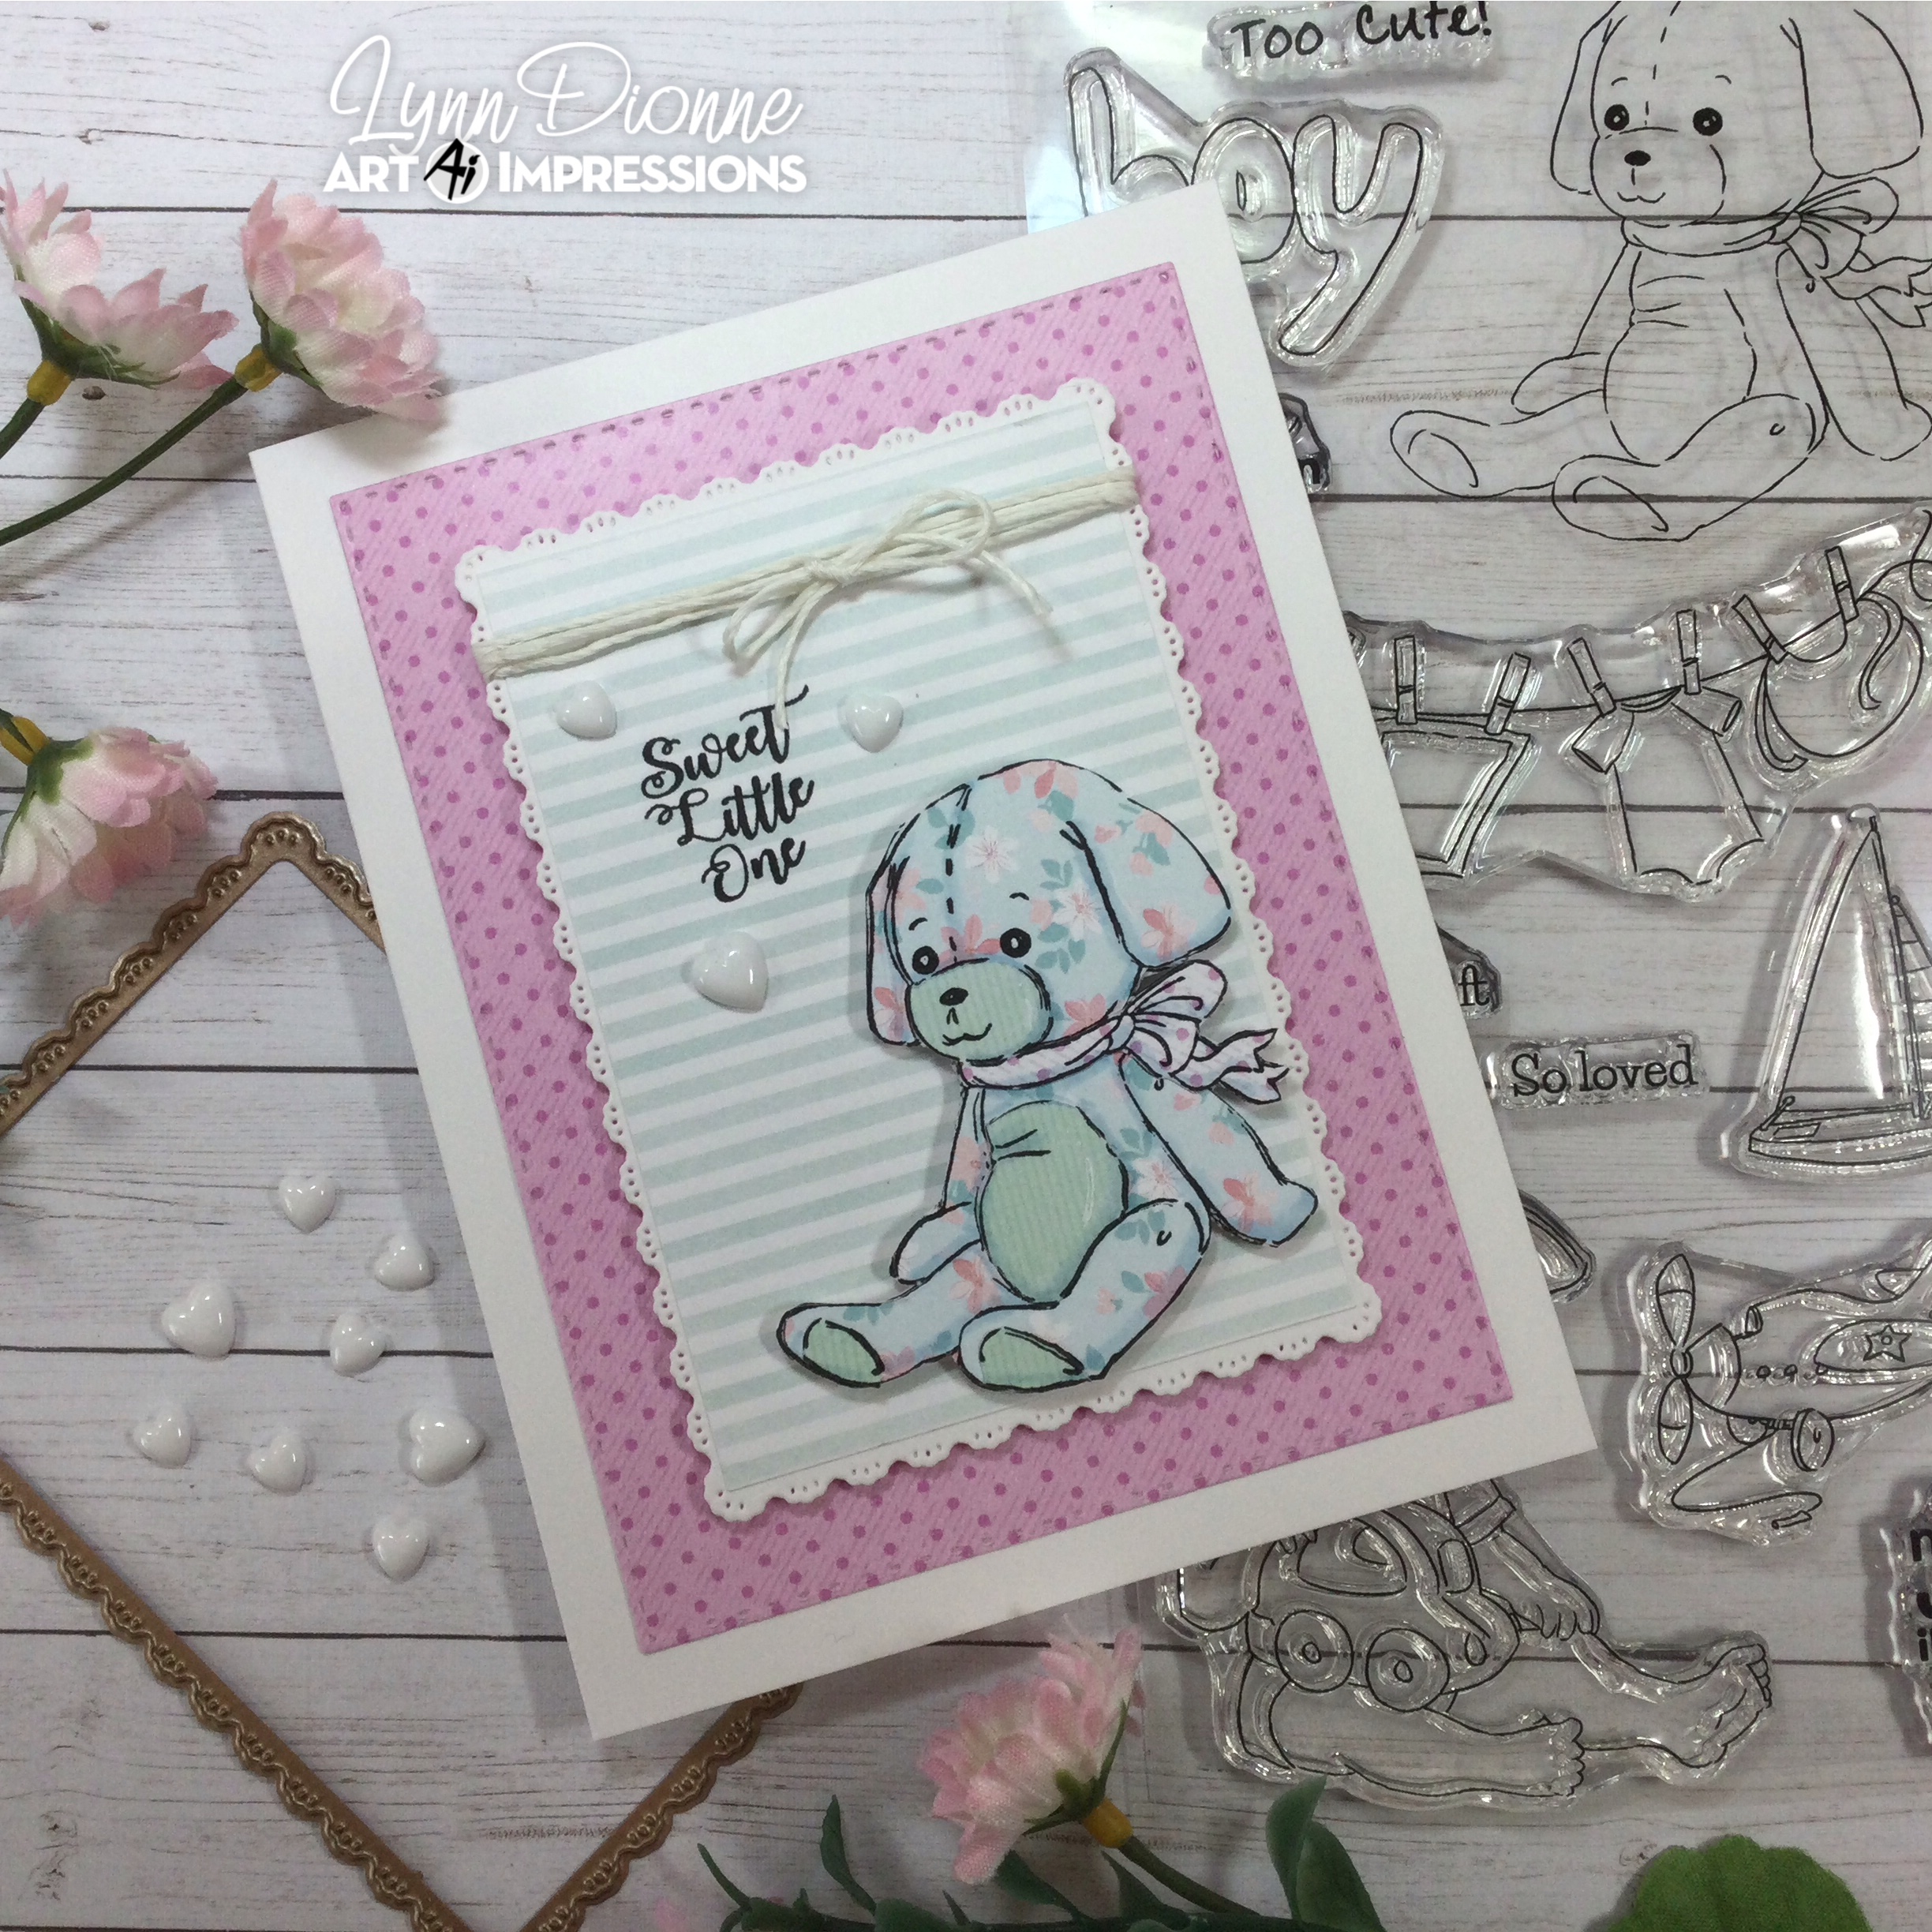
Today's card was inspired by the current Ai "Show Mom She's Special" Blog Challenge. Of course, if you change out the sentiments this card would be great for any occasion with all of its beautiful floral papers and cute little pocket tag! This tag could be removed by the recipient for a fun little bookmark as well!

Let's begin by stamping the stack of teacups and spoon using the brand-new Ai Tea Time Set (6024). For all of the coloring we will be using the Zig Clean Color Real Brush Pens in the following colors: Blender, Pale Yellow, Yellow, Shadow Pink, Pale Rose, Sea Green.

Next, we will use the Ai Portfolio Template Die Set (5952) to die cut the tag and pocket. The beautiful pattern papers are from the Ai Easter Bunny Paper Pack (6036). These 6"x6" double-sided paper packs are perfect for your layered cards since all of the papers coordinate so nicely!

Let's also die cut the layers for the card using the two largest dies from the Ai Rectangle A2 Double Stitched Dies (5063). We can layer these onto a standard A2 size card base.

Now, we can add a pretty plaid scalloped rectangle panel onto the card and then let's add the pocket onto to the card using some strong double-sided tape to attach this securely to the card. To this pocket we can add a strip of floral paper and the little spoon!

Let's add some Mother's Day sentiments from this same stamp set but again this card would be great for any occasion if you change out the sentiments for a special birthday, friendship, thinking of you, or thank you card!

For the tag, we will add some hemp twine in Dusty Rose and tie a pretty bow!

Again, using that same paper pack we will fussy cut some flowers and attach those to the cards, gluing some flat and popping up a few others.

As a finishing touch, we will scatter some pretty sparkly white gems around the card for added interest and fun!

Thank you so much for joining me today! Have a fun and crafty day!!!

Ai Tea Time Set (6024)

Ai Portfolio Template Die Set (5952)

Ai Rectangle A2 Double Stitched Dies (5063)

Ai Easter Bunny Paper Pack (6036)

Monday, May 12, 2025

Tea Time for Mom by Sharon Caudle

 Hello Ai Fans!!

I truly hope that all Mom's and Mom figures out there had a wonderful day yesterday and was able to celebrate your day with family and friends! I wanted to make a card using the new 6024 Tea Time Set. I stamped the teacup onto a Copic friendly paper using Memento Tuxedo black ink and then created a mask for it so I could stamp the flowers. I knew the flower bouquet stamp wasn't going to fill the top of the teacup, so I stamped it once above the teacup, and then stamped it two more times on a separate piece of cardstock. After coloring them all up, I played around with the additional two bunches of flowers to figure out how I wanted to place them to get the look I wanted, and then got busy fussy cutting the pieces that I decided on. There are two separate pieces that are actually popped up from the flat image of the teacup and flower bouquet. I'm a dimensional girl! LOL! I then stamped the sentiment on one banner, but cut an additional four banners with the same die.  I just glued them together and it comes out like home made thick chipboard. It makes the sentiment so sturdy, adds lots of dimension, and I didn't have to pop it up!  I just love the awesome stitch detailing around that banner die! 


So that's it for me today! Thanks so much for stopping by for a visit and until next time - stay crafty!!


Copic markers used:

RV10, 32, 34, and 69

G40, 43, and 46

B00, 41, and 45

T1 and 2


Sunday, May 11, 2025

Happy Mother's Day and Bakery MB by Gennette Houghton


Hello and Welcome to Watercolor Weekend. Wishing all of the wonderful Mom’s out there a very happy Mother’s Day!!  The new 6024 Tea Time Set has sentiments just for Mom, and is a beautiful set.  

I decided to use the largest tea cup for my card today.  I started off with a piece of watercolor paper and die cut the panel and then die cut out a decorative section in the upper corner. I then stamped my image in N49, after stamping off once in the bottom corner.  I used set 5937 My Trust Set for the flowers. Using the stamp positioner and in N49, stamping off once, and placing the flowers in the teacup.  I started with the flowers first by adding 817. I like to place color in the darkest areas first to set the pedals apart. Pulling that color out to the ends of the pedals and adding more color as necessary.  For the inside of the flowers I added 025 with a touch of 947, which I have found works really well with yellows.  I shaded around the flowers inside the cup with 565, and used the same color to give definition to areas of the cup and saucer.  For the flowers on the cup I used 703, trying to give it dimension without giving it to much.  I wanted it to appear a bit on the “flat” side.  For the leaves and stems I used 126. I also used 565 to shade under the teacup and under the saucer.  I then added just a touch of 703 around the outside edges of the image just to give a bit more dimension to it without adding to much color.   

I matted my image onto some pink cardstock and then attached it to my card base. Now you could leave this as it is, it would make a perfect card for any day occasions.  Going through my dies I decided on 5132 Tag Stitched Dies for my sentiment. I first stamped Happy Mother’s Day on some watercolor paper and then centered my die over it and cut it out.  After attaching this to my card I was going to put a gem over the hole on the tag and then remembered I had some little flowers in my stash and chose to use them instead.


My 2nd project today I used one of the newly released Matchbooks, 6013 Bakery Matchbook, the sweetest scene, look at all those goodies. The MB’s require 2 other additional sets, the 5317 MB Template Dies and the 5318 MB Envelope Dies, these work with all of the other MB sets in Ai’s line. I started out with permanent black ink, mixed media paper, a #1 and #4 brush. Personally I prefer to stamp all of my images, color them, and then die cut them out. I cut out the base template out of 5742 Easter PP, I felt the soft pink was perfect for the Bakery.  There are a lot of elements to this scene, but if you keep your color palette simple, you will breeze right through it. For all of the wood elements I used 947, and 969. For the background on all of the signs I used 761.  The table cloth 990, and 992. Cherries I used 856, and 969.  The bread and rolls 992, 947 and 969. For all of the pink elements I used 761, 772, 817, and 837 was used on the pie.  For the spoon, and the cake stand, I used N60 and N52. The doily and pie stand I shadowed with 565.  Yellow cake I used 025.  Chocolate cake I used 992, 969, and 899.  Books are 817, 243, 403, 025, and 992. Blueberry tart I used 565, and the tin N60, and N52.  Cupcake stand I used 243, 969, and shadowed the glass with 565.  Once everything was colored, I then used the included dies. The dies have score lines so that you can easily fold the tabs on each piece.  I used the 5317 MB Template Die and 5742 Easter PP and assembled the Matchbook together. If you would like to see a tutorial on how to put these together, Bonnie has a wonderful tutorial that you can watch HERE. Don’t hesitate to ask if you have any questions, I will do my best to answer if I can.  Thank you for joining me today, and I hope you enjoyed my projects.  Until next time, Create….Share….Inspire!


Saturday, May 10, 2025

Tickled Pink for Mother's Day by Janet 🌸

Hello crafty friends! With Mother's Day just around the corner (it's tomorrow!), I'm absolutely in the mood for pink! Today's card is a celebration of all things lovely, featuring the gorgeous 6024-Tea Time Set, a beautiful collection of tea-themed stamps and dies.

To create a pretty backdrop for my teacups, I pieced together a striped design using shimmering silver metallic cardstock and two delightful patterns from the 6034-Inspirational Easter Cover Paper Pack (who says Easter paper can't be versatile?! 😉). To add a touch of elegance, I wrapped a soft pink satin ribbon around the bottom and finished it with a sweet bow before adhering the whole panel to a crisp white A2 card base.

And of course, the inside needed some love too! I stamped a heartfelt "Happy Mother's Day" along with a delicate flower sprig – both included in the wonderful Tea Time Set.

Next up, my favorite part – bringing that adorable stacked teacup image to life with my COPIC markers! I had fun choosing a vibrant mix of colors for each cup, making them unique. To add a little extra flair, I used the sweet flower sprig from the set to decorate a couple of the cups. For a touch of whimsy and shine, I dotted other cups with both a white and a gold pen.

The set also includes a matching stamp and die for the spoon, which I stamped, colored, and then easily cut out – such a handy addition!

To create a focal point for the teacups, I die-cut a white and a pink oval using the 5727-Nested Oval Dies and layered them together. Then, I popped the colored stacked teacup image on top with two layers of foam tape for lift and dimension. I positioned this oval just above the ribbon on my card and tucked the little spoon alongside it.

I hope you enjoyed seeing how I brought this teacup image to life! It's amazing how coloring and a few details can really make a stamp shine. Don't forget to visit the AI store for all your card-making  essentials. Happy Mother's Day!

Janet YouTube - Blog - Facebook - Instagram - Pinterest 

Friday, May 9, 2025

Happy Mother's Day! Card by Tasha

Happy Friday, Art Impressions Friends!

Tasha here, and I’m excited to share a sweet Mother's Day card featuring two new Art Impressions sets: 6024–Tea Time and 6039–Just For Her! This card was inspired by the Art Impressions “Show Mom She's Special!” Challenge and made with love for my amazing Mother-in-Law.

I started with a metallic pink base for a soft, elegant shine, and layered it with gorgeous floral paper from the new 6051–Mother’s Day Paper Pack—I just love how fresh and pretty the prints are!

The centerpiece of the card is the adorable tea set, which I stamped, colored with pink-toned Copic markers, and then die-cut using the matching dies. I added dimension with foam tape and even drew in tiny pink flowers for a personal touch. A white gel pen helped brighten the details and highlight the flower centers.

To finish it off, I added the “Happy Mother’s Day” greeting and layered in some silver glitter paper—because a little sparkle goes a long way!

I hope this card inspires you to create something special and join us in the Show Mom She’s Special! Challenge. Wishing you all a creative weekend and a Happy Mother’s Day!


Thursday, May 8, 2025

Show Mom She's Special! Challenge #403

Hello Ai fans and welcome to
Challenge #403 Show Mom She's Special!

Create a handmade card or craft for a mom.
We're guessing that you all just made, or are about to make a card for some mother in your life.
I've already made and mailed my Mother-in-law's card. My own mom's will probably be made Saturday, if not Sunday morning! She's local, it's okay...lol.

Before we see what our Featured Designer Janet created, let's see who won our UN-BEAR-ABLY CUTE! Challenge.

Our Top Spot went to Andrea W.
She used the 5821 KH – Panda Set which
she cut out with 5064 – Circle Double Stitched Dies


Please contact Leah at Feedback@artimpressions.com
to claim a free stamp set of your choice!!
Be sure to grab our badge to display on your social media too!


Our Lucky Random Winner was April J.


She used the 5113 – Pand-tastic Set along with some
gift boxes from 5451 – Special Window Set


Please contact Leah at Feedback@artimpressions.com
to claim a free stamp set of your choice!!
Be sure to grab our badge to display on your social media too!

---------------------------------------------------------------------------------------------------------------------------------------------------

Now let's see what Janet has created. Though her cards are always gorgeous, I think that this is one of the prettiest things she's ever created!  The colors are beautiful and the layout is so unique. What wonderful inspiration for your Mother's Day card.

Mother's Day is the perfect time to brew up something special for the amazing women in our lives. This year, let's go beyond the usual and create a beautiful handmade fancy fold card featuring charming tea images and sentiments from the 6024 - Tea Time Set

This design adds a touch of elegance and surprise, making your heartfelt message even more memorable. So, grab your crafting supplies, and let's get started! 

Step 1: Creating the Fancy Fold Base

We'll be making a simple yet elegant gatefold card with an added angled twist.

  1. Cut your main cardstock: Cut a piece of pink cardstock to 5 1/2 inches x 11"
  2. Score the cardstock: Place the 11-inch side along your scoring board. Score at 3 3/8" inches and 7 5/8 inches
  3. Fold the card: Fold along the score lines to create two flaps that overlap in the middle. This is the gatefold.
  4. Add the gatefold "Twist" - Trim Flaps: Now, on each flap, mark cut lines with a pencil as indicated by the photo and then trim with a scissors. This creates the angled flaps for the card. See diagram below.
  5. Cut patterned paper inserts for each flap: Cut inserts using the measurements shown below. I chose patterns from 6052 - Mother's Day Cover PP. Be sure to change the angle to fit the angles on the left and right flap. I made a template out of cardstock and used it to mark my lines as I found that helped me assure that I cut the inserts correctly.
  6. Glue the inserts on each flap: Leave an even border around each insert.
  7. Cut an inside panel: Cut a piece of white or light-colored cardstock for the inside of your card where you'll write your message (approximately 5 3/4 inches by 5 3/4 inches).

Step 2: Stamping and Coloring the Teacup, Flower Sprig, and Tea Tray
  1. Stamp the teacup: Stamp the cup with the flower on it onto a piece of alcohol marker friendly cardstock. 
  2. Stamp the tea tray: Stamp the image in the bottom left corner of the center insert.
  3. Stamp the sentiment inside: Stamp Happy Mother's Day above the tea tray on the insert.
  4. Stamp the flower sprig: Choose your favorite flower from the 5917 - Floral Bouquet Set.
  5. Stamp the card front sentiment: Stamp in black and cut it out with the smallest oval from   5727 - Nested Oval DiesCut another slightly larger oval from pink cardstock. Stack the two pieces together using foam pads between the sentiment and the pink oval.
  6. Color your images: Bring your teacup, flower sprig, and tea tray to life with your chosen coloring medium. I chose vibrant pink and blue but also think about using soft, spring-like colors that evoke a Mother's Day feel. You can add details like lines or patterns on the cup. Use shading to make the flowers and cup more dimensional. I've included a list of COPIC markers I chose at the end of this post.
  7. Fussy cut and die-cut: Once you're happy with your coloring, carefully fussy cut around the flower spray image and use the included die to cut out the teacup image.
  8. Cut an insert slit in the teacup: Use a craft knife to make a slit in the edge of the teacup. This allows you to insert the flower stem so it appears to be inside the cup. Glue the flowers in place.


Step 3: Create a Belly Band
  1. Cut out Journal Clasp: Using the heart clasp die included in the 5806 - Slim Journal Template set out of pink cardstock cut the two clasp pieces from pink cardstock.
  2. Cut two nested ovals: Cut smaller oval with polka dot paper from the PP. Cut a larger oval from pink cardstock.
  3. Glue the nested ovals together: Leave an even pink border around the edge.
  4. Cut a support strip for the belly band: Cut a strip from the long side of the cover paper at 1 1/4 inches.
  5. Glue the clasp pieces to the strip and the oval: Glue the patterned strip to the lattice heart clasp. Glue assembled band to the oval, shaping it around the card and folding it to fit snugly (but not so tight you can't slip it on or off easily). Glue so that the heart clasp is to the far right of the oval. The embellished belly band will keep the card shut until it's opened. 
  6. Arrange teacup & flower image on the oval: Place the teacup to the left of the heart clasp.


Step 4: Add Finishing Touches
  1. Add a gem to the heart clasp: I chose a pink heart pearl to add to the center of the heart clasp.
  2. Adhere the card front sentiment: Glue the front sentiment on the right flap.
  3. Slip belly band on card.

Your "Steeped in Love" Angled Gatefold Mother's Day Card is Complete!


This unique fancy fold card with its charming tea images is sure to delight your Mom on her special day. The interactive angled gatefold adds a twist, and your personal touches will make it a cherished keepsake. 

COPIC Markers Used for This Card:
B24, B23, B21
Y35, Y06, Y13,YR02
YG61, YG17
R81, R83, R85
0, C0, C1, C3

Share Your Creations!

We'd love to see your beautiful challenge cards! Add photos of your creations to our Show Your Mom She's Special challenge post. You might just win a free stamp set for your efforts. Though not required to participate in our challenge, we love you to also share them on your social media using the hashtag #ArtImpressions to tag us!  Happy crafting, and Happy Early Mother's Day to all the wonderful mothers and grandmothers out there!


Janet YouTube - Blog - Facebook - Instagram - Pinterest 

✻ Please make a new card or handmade crafty creation. You can make any item you wish; this is not limited to cards! (unless specified)

✻ Limit two submissions per person.
 ✻Please include your first name and last initial on your submission. You may include your entire last name, but it's not neccessary.
✻We love to comment on your entries, but keep in mind if you use a private group or a platform that you need to sign up for, we probably won't be able to.
✻ The Ai Challenge is open to everyone, international submissions are welcome!
✻ Include a link back to the Ai Blog or grab our button on the top right of our sidebar!
✻ Share the Ai love if you can, by clicking and commenting on your fellow crafters.
✻ Make sure to get your link up by the deadline to enter your creations.
✻ Good luck and happy stamping! 


You are invited to the Inlinkz link party!

Mother's Day Pocket by Dori Mendiola

 Happy Thursday AI Friends!

My cards today feature the new #6041 - Flower and Bug die.  This is such a fun set and makes the cutest flower when you pair it up with the Art Impressions paper packs.

My daughter became a first time mom and my daughter-in-law had her second baby both this past year.   (I'm a Happy Happy Grandma!!😁)  Since they are new moms, I decided to make them each a Mother's Day pocket card that holds a flower of the month gift certificate as well as a couple of little bookmarks using the #5723 - Journal cover and Bookmark dies.

I started by making the pocket using the #5806 - Slim Journal template.  I die cut the journal with the #5940 Journal cover plaid PP and cut it in half between the score lines.  I made another score line at 1/8" in from the original score line on both pieces.  I folded each score line creating a pocket tab on both pieces.  I then placed a slight line of glue on each tab and glued to the flat side of the other piece.  When both sides are glued down, the pocket is created.  I sealed the bottom of mine but it is optional if you have a stopper at the top holding the gift card (such as the bee clothes pin).  The bee and ladybug dies come with the #6041 - Flower and Bug set.  Adorable little embellishments!
I made another pocket on the front to hold the bookmarks.  I used the #5952 - Portfolio die set to create the scallop edge on the pocket.  As for the flower pot, I just free hand cut that and inked with Distress oxide antique linen.  The watering can and the mini flower die cuts came from the #5336 - Garden Mini die set.


I hope you enjoyed my post and you have a wonderful Mother's Day on Sunday!

Thanks for stopping by!  Have a great day and keep creating!

Wednesday, May 7, 2025

Paper Piecing for a "Sweet Little One" Card by Lynn Dionne

 Happy Wednesday Ai Fans!!!

Watch video tutorial here!!!

Let's create a simple "Sweet Little One" card today using a fun and easy paper piecing technique for the little stuffed animal as well as some pretty pattern paper layering!

For our focal image we will use the Ai Baby Boy Set (5184) and we will stamp the stuffed puppy onto some white 100lb cardstock and then on some three different pattern papers from the Ai Inspirational Easter Double Sided Paper Pack (6033). We will stamp once for the body, one for the tummy, face and feet, and one for the bow!

Now we can cut out the entire white puppy and just the pieces we need from the other three pattern papers. Now we can glue these together to create a wonderful floral stuffed animal with lots of pattern and interest! This is such an easy way to get some pattern onto your projects if you are unsure how to draw them on yourself.

Let's keep the rest of the card fairly simple by creating a standard white A2 size card and add a pink polka dot layer using the Ai Rectangle A2 Double Stitched Dies (5063).

For that sweet scallop frame, we will use the brand-new Ai Decorative Belly Bands Set (5804) and die cut this from some white cardstock and then layer on a pretty striped paper from that same paper pack to fit inside the frame (3 7/8" x 2 5/8"). We can glue these two together but before we add this to the card, we can add a cute little sentiment from the Ai Baby Girl Set (5185).

Next, we will add some hemp twine in white and then pop up this entire panel on the card front.

As a finishing touch, let's add some pretty white hearts around the sentiment!

Thank you so much for joining me today!  Have a fun and crafty day!!!

Ai Baby Boy Set (5184)

Ai Baby Girl Set (5185)

Ai Belly Bands (5804)

Ai Rectangle A2 Double Stitched Dies (5063)

Ai Inspirational Easter Paper Pack (6033)

Tuesday, May 6, 2025

To the Best Mom! by Reneé Matarese

 Hello Ai fans!

Today I'm sharing the card that I made my Mother-in-law this year.

Throughout all of the years that I've known her, over 33 now, cards have always meant a lot to her. She takes great care in choosing the perfect card for someone so she has always treasured my handmade cards.


I apologize for whatever is on the B. It's gone now but the card is in the mail and can't be re-photographed. I used Wink of Stella to give it the shimmer of real porcelain.


I framed the pretty sentiment and teacup with some oval dies from Art Impressions.
Everything is linked below.  I hope you all have a wonderful Mother's Day.

I used Copic markers to color my image.

BV000, BV000, BV20, BV31, G82, N1, Y15, R000, R20

I hope you all have a wonderful Mother's Day.